Syncthing是一个开源的同步工具,支持多版本控制,同时支持Windows、Mac OS X、Linux等客户端,和Resilio有点类似,但是又略有不同,这篇文章介绍一下Centos安装Syncthing工具的方法。

一、下载与安装
Syncthing工具配置非常的简单,小z博客以CentOS X64为例,如果您需要其它版本的客户端请访问:syncthing官网下载。言归正传,下面就开始分别执行命令:
### 下载客户端
wget http://soft.vpsno.com/script/syncthing-linux-amd64-v1.3.4.tar.gz
### 解压
tar -zxvf syncthing-linux-amd64-v1.3.4.tar.gz
### 进入目录
cd syncthing-linux-amd64-v1.3.4
### 复制到环境变量
cp syncthing /usr/local/bin/
接着我们需要先运行一次让Syncthing自动生成初始配置文件,上面已经加入环境变量,直接输入syncthing即可运行,会看到下面的运行结果。
[root@xiaoz ~]# syncthing
[monitor] 20:37:05 INFO: Starting syncthing
[start] 20:37:05 INFO: Generating ECDSA key and certificate for syncthing...
[7NYBG] 20:37:05 INFO: syncthing v0.14.11 "Dysprosium Dragonfly" (go1.7.3 linux-amd64) [email protected] 2016-11-15 06:23:48 UTC
[7NYBG] 20:37:05 INFO: My ID: 7NYBGD4-AL5FI6M-6P5ULKJ-QSPFASO-T57T4QW-WETWQXT-CAGTJ2I-3PFQGQP
[7NYBG] 20:37:06 INFO: Single thread hash performance is 154 MB/s using minio/sha256-simd (95 MB/s using crypto/sha256).
[7NYBG] 20:37:06 INFO: Default folder created and/or linked to new config
[7NYBG] 20:37:06 INFO: Defaults saved. Edit /root/.config/syncthing/config.xml to taste or use the GUI
[7NYBG] 20:37:06 INFO: Ready to synchronize sxdwy-d7npj (readwrite)
[7NYBG] 20:37:06 INFO: Using discovery server https://discovery-v4-2.syncthing.net/v2/?id=DVU36WY-H3LVZHW-E6LLFRE-YAFN5EL-HILWRYP-OC2M47J-Z4PE62Y-ADIBDQC
[7NYBG] 20:37:06 INFO: Using discovery server https://discovery-v4-3.syncthing.net/v2/?id=VK6HNJ3-VVMM66S-HRVWSCR-IXEHL2H-U4AQ4MW-UCPQBWX-J2L2UBK-NVZRDQZ
[7NYBG] 20:37:06 INFO: Using discovery server https://discovery-v4-4.syncthing.net/v2/?id=LYXKCHX-VI3NYZR-ALCJBHF-WMZYSPK-QG6QJA3-MPFYMSO-U56GTUK-NA2MIAW
[7NYBG] 20:37:06 INFO: Using discovery server https://discovery-v6-2.syncthing.net/v2/?id=DVU36WY-H3LVZHW-E6LLFRE-YAFN5EL-HILWRYP-OC2M47J-Z4PE62Y-ADIBDQC
[7NYBG] 20:37:06 INFO: Using discovery server https://discovery-v6-3.syncthing.net/v2/?id=VK6HNJ3-VVMM66S-HRVWSCR-IXEHL2H-U4AQ4MW-UCPQBWX-J2L2UBK-NVZRDQZ
[7NYBG] 20:37:06 INFO: Using discovery server https://discovery-v6-4.syncthing.net/v2/?id=LYXKCHX-VI3NYZR-ALCJBHF-WMZYSPK-QG6QJA3-MPFYMSO-U56GTUK-NA2MIAW
[7NYBG] 20:37:06 INFO: TCP listener ([::]:22000) starting
[7NYBG] 20:37:06 INFO: Completed initial scan (rw) of folder sxdwy-d7npj
[7NYBG] 20:37:06 INFO: Loading HTTPS certificate: open /root/.config/syncthing/https-cert.pem: no such file or directory
[7NYBG] 20:37:06 INFO: Creating new HTTPS certificate
[7NYBG] 20:37:07 INFO: GUI and API listening on 127.0.0.1:8384
[7NYBG] 20:37:07 INFO: Access the GUI via the following URL: http://127.0.0.1:8384/
[7NYBG] 20:37:07 INFO: Device 7NYBGD4-AL5FI6M-6P5ULKJ-QSPFASO-T57T4QW-WETWQXT-CAGTJ2I-3PFQGQP is "xiaoz" at [dynamic]
[7NYBG] 20:37:11 INFO: Automatic upgrade (current "v0.14.11" < latest "v0.14.12")
[7NYBG] 20:37:17 INFO: Detected 0 NAT devices
二、修改配置文件
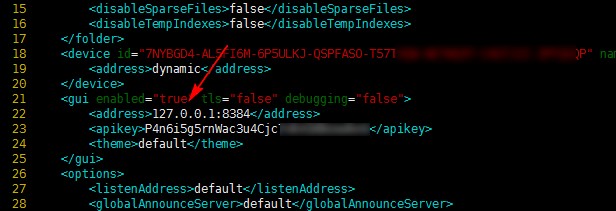
上一个步骤输入syncthing已经成功运行,并生成了对应的配置文件,输入Ctrl + C退出客户端。我们需要修改下默认的配置文件:vi ~/.config/syncthing/config.xml大概在22行左右的配置,将127.0.0.1修改为0.0.0.0,如下截图。
三、放行端口
syncthing默认监听8384端口,我们需要在iptables放行这个端口,依次输入下面的命令。
### 放行8384端口
/sbin/iptables -I INPUT -p tcp --dport 8384 -j ACCEPT
/etc/init.d/iptables save
service iptables restart
四、测试访问
再次输入syncthing命令启动Syncthing客户端,然后在浏览器输入:http://您的服务器IP:8384进行访问。
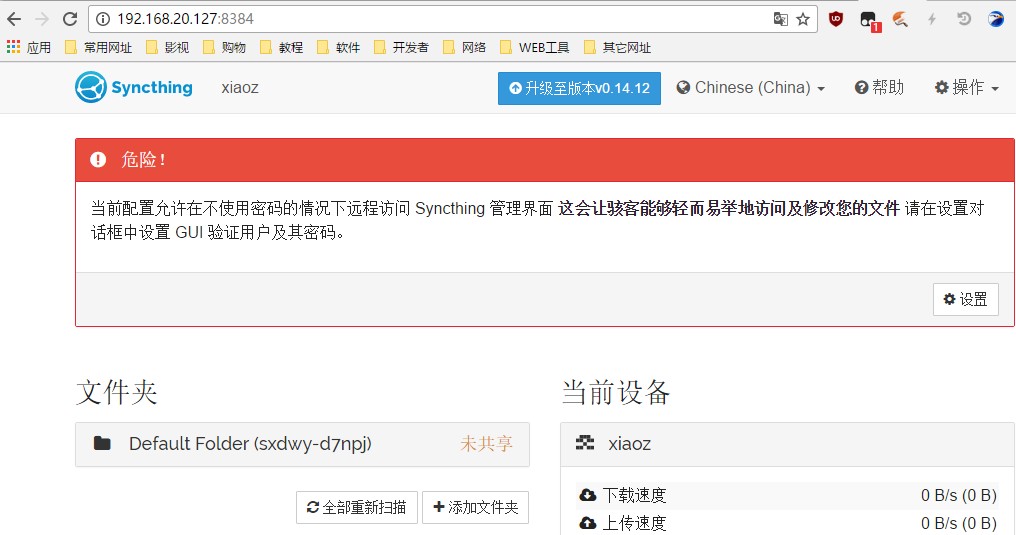
Syncthing默认支持中文语言,首次登录会让您设置用户名和密码,到这里基本上就完成了,如何添加其它设备和同步文件夹可以自行研究下。
五、其它说明
如果希望Syncthing在后台运行可以使用nohup命令来实现:nohup syncthing &
六、总结
Syncthing可以在不同设备之间实现同步,前提是已经安装Syncthing客户端,另外还支持历史版本的功能,如果有条件您完整可以利用Syncthing打造自己私有的同步工具。


评论前必须登录!
注册